
Wig Making
Each hairpiece available was made either by a human or machine. Might you want to figure out how to make your own hairpiece? It will save you a large chunk of change as great hairpieces are really costly. You can figure out how to make your own hairpiece by following the nitty-gritty hairpiece-causing guide we have for you. So on the off chance that you resemble the numerous women out there who need to learn hairpiece making, follow our aide, and you will shake your first hair piece sooner than later.
Notwithstanding, before we hop into what apparatuses you really want to get everything rolling, how about we comprehend the various kinds of hairpieces. To compose a far-reaching piece on hairpiece making and hairpiece care process, Essayhave a paper composing administration.
Kinds of Wigs
For you to really see the value in the process it takes to figure out how to make a hairpiece appropriately, an essential comprehension of the sorts of hairpieces is significant.
With regards to hairpieces, we have five principle types that are obviously characterized by their conclusion in particular ribbon front-facing, conclusion, fractional, full customary, and the 360 trim front-facing.
So we should perceive how everyone functions.
The 360 trim front-facing hairpiece
This is a hairpiece that the ribbon broadens the whole border of the brow making the deception of your regular hairline. This kind of hairpiece when appropriately made will appear as though you have regular hair.
Trim front-facing hairpieces
Trim front-facing hairpieces are the most famous sort of hairpiece known to women and the most generally reproduced while making a hairpiece on your own. Very much like the 360 ribbon front, the trim front-facing likewise copies the presence of your normal hairline.
Conclusion hairpieces
Hairpieces made with a conclusion are a conclusion hairpiece. Try not to become this befuddled as all hairpieces have a conclusion utilized in various habits. The conclusion is a piece of cross-section texture onto which the hair is sewn on that looks like the foundation of your hair and permits the hairpiece to sit level when you wear it.
The fractional ribbon hairpiece
Otherwise called the half hairpiece is a hairpiece that permits you to fuse your regular hair when worn. The full trim hairpieces – The full ribbon hairpiece is a hairpiece produced using a hairpiece cap that will cover the whole circuit of the head. These hairpieces are normally the most straightforward to wear and make. In spite of the fact that they require complete focus to needle the strands through each lattice opening, the closure results are continuously astounding.
Since you know the kinds of hairpieces, we are certain you are concluding which you will very much want to make first. Try not to rush off presently; you want devices with a few instruments to get everything rolling.
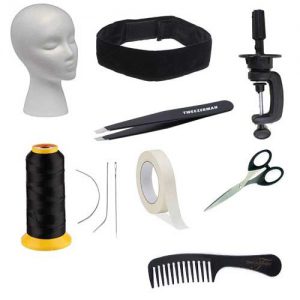
Fundamental Wig Making Tools
No matter what the reasons you need to fiddle into hairpiece making, you want the right device, while the rundown isn’t long, the things are fundamental in figuring out how to make a hairpiece (or for this situation, your first hairpiece).
- A mannequin head
- A wig cap (adjustable is better)
- Needles and thread
- Pins to hold the cap in place (you can use tape or adhesive too)
- Scissors for cutting and trimming as you string along
- Tweezers
- Comb and hair conditioner
- Lace closure
- Hair bundles
These are the basic items you need, you can buy them once and use most except the hair bundles to continue to create unique wigs for yourself or for sale.
What number of Brazilian hair packs do you have to make a hairpiece?
The decision of hair (augmentation) is an unquestionable requirement while investigating making a hairpiece. The hair will decide how the completed item will resemble.
While engineered hair is modest and comes in wild tones you will like, they aren’t sturdy and lose their radiance and sparkle in several months.
Human hair, notwithstanding, is tough, looks great subsequent to completing your hairpiece, and can be exposed to the standard regular human hair treatment like washing, molding, heat treatment, or twisting.
Besides, a decision of virgin hair is the most ideal choice assuming that you are making a straight hair hairpiece. All things considered, purchase your Brazilian straight hair 3 groups with 4 by 4 trim conclusion here.
You should be passing on to hop into the course of how to make your hairpiece; unwind, we will arrive in a second. Look at Essaydoc modest article compose for quality papers on a wide scope of themes:
How to make a hairpiece?
Is it true that you are prepared?
The Hair Bundles
The principal thing you will require is heaps of hair, in this instructional exercise we are utilizing the Brazilian straight hair; 3 heaps of it. We are utilizing this hair since it is not difficult to work with; it is unique and regular looking. It additionally functions admirably for new amateurs in the hairpiece-making business.

This hair is straight, satiny, and will sit on your head like genuine hair, the hair augmentations measure long 24 inches, 22 inches, and 20 inches separately. Check it out:
The Closure
This is the following thing we really want in our hairpiece-making process. A conclusion is fundamentally a fix of hair that looks like your genuine hair and lies directly toward the front of your head by your brow and helps close the hairpiece off.
At the point when you purchase terminations for hairpiece making, they have small bunches right where the hair is, and that is the way the hair is gotten unto the ribbon as you make your hairpiece. Notwithstanding, in hairpiece making the bunches, looks so counterfeit, and amateurish.
So to eliminate this incomplete look from the conclusion, you can fade the bunches with hair fade, so the hair looks more normal and mixes in impeccably with your scalp.
The Bleaching Process
Presently the dying system is intended for experts, yet since you have arrived, we can assist you with the interaction. Take the precise amount of the fading item you need to utilize and blend them until the combination is blended appropriately.
- Remember the final mixture must be thick, and pliable to allow you to apply it to the knots properly.
- If the mixture is too runny, it can bleed into other areas of the hair and cause damages that you won’t like. So thick is the right way to go
- Now wash the bleach off the knots taking care not to rub roughly, but squeeze gently to remove excess water.
- Next, apply some toner of the closure part to remove any excess yellowish color from the closure so that it looks very natural.
- Condition the hair, by rubbing an ample amount unto the hair and rubbing across the length of the hair with your hands, then rinse off under running water.
- Place the closure on a towel and allow it to dry out while you get on to the next process. We are using a 4 by 4 lace closure here.
Placing the Closure
You will notice that the dome cap has two lines in the front, let this point be the front of the head, this is also where the closure will be fitted.
Using a wig pin, hold the closure unto the dome cap into the head. The edge of the closure should line up perfectly with the edge of the dome cap on the mannequin.
Before measuring your head, prep your needles and set them aside, we will be using curved needles and nylon threads. Nylon threads are easier to sew with, they don’t get tangled up, and they are water repellent, unlike cotton threads.
Sewing the Closure
Insert the threaded needles through the bottom part of the dome cap; lace the thread through the needle and pull to make a knot.
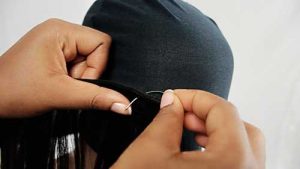
You keep threading the needle through the loop along the length of the closure on one side. When you are done with one side, DON’T sews around the closure; knot the end, cut off with the scissor and move to the opposite side of the closure.
This technique allows you to even the closure properly to create a flat top for the wig. Repeat the thread in the loop process for the other side and end at the back of the closure.
Now you can sew the back end of the closure after you have strengthened the closure ensuring that it is not chunky but flat.
Note – try to thread the needles the length of your arm when stretched, this way you work effectively. If the thread is too long, it tangles and the situation is just messy. So arm length is the best and also thread at least ten needles so that you don’t need to constantly thread a needle when the thread is done.
To end the knot, do wrap around the needle a couple of times to create a strong and firm knot.
Next, you flip the dome cap inside out and place it on the head, this way your closure is on the inside now.
Creating the side flips
The side flips allow you to brush your hair inside or that part that gives it more body when the wind blows.
- Take about 4-inches of hair in two places, position one piece at the side of the closure and using the same thread and loop process, stitch it to the dome cap starting from the sides of the closure.
- Repeat the process with the other side and cut off any excess thread from both ends after doing the wrap around the needle knots.
- Next, take another piece of hair that will be attached to the back. Don’t attach a long piece around the remaining part of the cap as you will lose the elasticity of the cap which isn’t what we are aiming for.
- Now take a hairpiece the length of about 5 to 6 inches – a little longer than what was used in the front side. Add a little nail glue at the edges of the piece; this will stop the hair from losing as you sew the hair to the lower end of the cap.
- Repeated the needle, and loop process for the length of the hair cut off excess threads, and now we flip the dome cap back to position.
- Now the work begins, we have gotten the closure, the sides, and the nape of the neck done.
- Take a longer bundle, the 24 inches, (if you want volume, double the weft of hair by folding it over itself).
- Attaching the ends to the nape of the neck, precisely where the shorter pieces are placed at the back of the cap, and then start sewing the new piece from the same line.
- You will notice that the edges protrude a little, to level this, thread over the point a couple of times to smoothen it out. Continue sewing across the length of the hair until you reach the edge.
- Now when you fold the edge over, it will look bulky, so open up the hairpiece and only fold on the piece over then continue across the curve of the dome cap until the bundle is done.
- The spacing in between the rows depends on how much hair you have; we are using three bundles, so space should be about one finger or one and a half wide.
- Use the wig pins to hold the hair bundle in place, this way you sew faster and cleaner, but also see what you are doing and avoid mistakes.
- Take the next bundle, double only half of it and place it over where the last one stops, and keep sewing. Always make sure that you sew joints properly and tightly so that it does loosen during use or maintenance.
- Basically, you keep working your way through the circumference of the dome cap until you reach where the closure is seated in the front of the head.
- In case you have a little gap, cut off excess hair and sew the remaining piece into space. Take the hairpiece and fill in any gaps in the wig cutting off excess hair and thread as you go along.
- Keep going, and sew in the final piece right into the lace of the closure on both sides of the wig to give a flowing pattern
Now that the hair is sewn onto the cap, remove it from the head and try it in your own head to see how it fits.
Take the scissors and cut the portion of the dome cap over the closure, since this area will be over your scalp hence you don’t want people knowing it is a wig.
Wow such a long process, but we aren’t done yet.
We have to attach a band to avoid the wig from flying off your head on a windy day.
Fixing the Band
This requires a little maths, but it is easy.
If your head was 22 inches around, you subtract the length of the closure from this number; our closure was a 4 by 4.
So 22 – 4 = 18 inches
- Take off an additional 2 inches from 18 inches to get 16 inches which is the band length; this will allow the wig to sit tightly on your head without fear and give it some stretch too.
- Measure the length for the elastic band; in this tutorial, we used a one and a half inches thick elastic band. One end is attached on one side of the closure from the inside and threaded using the same pattern used in fixing the hair onto the cap.
- Repeat on the other side too.
Finally to give the wig a natural front look, use tweezers to pluck the closure and comb out the excess hair (it is better to tweeze the hair when it is wet).
Cut off the excess lace of the front lace closure.
Wearing your Wig
To give the wig a grip on your hair, you can wear a scalp cap or better cornrow your hair; place the wig frontal to the forehead and the elastic band over to the back.

Flip over and arrange the hair, condition and comb out, look for the part and tweeze it for some natural look.
For the front of the hair, add a touch of black eyeliner or mascara to cover up any extra lace in the front to match with the rest of the hair. Spray the hair with a leave-in conditioner and comb it out.
And we are done your first wig, and now you know how to make a wig. Go try it out and let us know how it turned out.
Good luck!


