
One of the various work categories is photography. There are two main types of photographs taken: those taken for business and those taken for leisure. However, in both circumstances, the photographs become fuzzy. How to fix blurry pictures on Android is a question asked by Android users; however, how to repair a blurry image on iPhone is asked by iPhone users.
People have been looking for mechanical shortcuts and simple solutions to problems that need the least human effort; therefore, they started searching for a technique to correct blurry pictures. A few strategies for improving graphics performance will be addressed, as well as the miracle of Wondershare Repair will also be revealed in this article.
Common Ways to Fix Blurry Pictures
It’s aggravating to be irritated by the reality that each image you take appears to be fuzzy. Although if you follow the instructions or prevent it from occurring that enable a picture to appear blurry, you will always end up with the same result.
In such circumstances, we will show several simple procedures that you can use to restore your damaged photo to its original state.
Method 1: Use Photoshop to fix the problem
In the photographic profession, Photoshopping is the most helpful touch. Photoshop can restore blurry photos and also has assisted many users in recovering corrupted images; however, for those who’ve never used it, we will show you very well how to fix blurry photos.
To begin, navigate to the ‘Filter’ option.
- Select the ‘Sharpen’ option from the filter panel after opening it.
- Choose the ‘Shake Reduction Filter’ from the drop-down menu. The filter will automatically analyze the image.
- After the scanning is finished, a toolbar will display on the screen, which will vanish when the scan is finished.
- Once the issue has been rectified and the image is presentable, Photoshop will show you the improved image.
Method 2: Android and iPhone Repair
Users of Android
If you aren’t using Photoshop to remove fuzzy photographs and you’re an Android user looking for a simple solution to how to edit a blurry image on Android, we’ve got you covered.
- First, go to the ‘Settings’ section of your phone.
- Locate and select ‘Applications.’ Select ‘Application Manager’ from the drop-down menu.
- Now, swipe left until you’ve seen the option to select the ‘All’ menu.
- Next, look for the ‘Camera App’ and select it.
- A popup will appear; select ‘Force Stop’ to force the program to close.
iPhone users will appreciate this.
Assume you’re not a fan of Android. So, how will you figure out how to edit a blurry iPhone photo? Let us demonstrate how to restore a photograph on an iPhone.
If you already have the iPhone 8 or before, twice the current home button to activate the app selector. Slide up, catching the bottom towards the center of the screen if you have an iPhone X and higher.
To shut the camera app altogether, slide it off the top right of the screen.
Since this iPhone camera application may crash and the photographs become blurry, if you do something and then reopen the camera app afresh, you will receive refined photographic results.
These are some common methods to photo repair but if you are looking for an efficient option, read below.
How to Fix Blurry Pictures with Repair
As stated previously, let me now present the gadget that will revolutionize your lifestyle. A wondershare Repair is a helpful tool in the field of photo correction. It enables users to fix as many images as they desire. The downloadable tool is way simple to use and requires three steps.
Let’s take a stroll of the application’s steps collectively if you’ve never utilized that before, and you can do that on your lonesome later.
Users can install the tool first and then use it whenever needed.
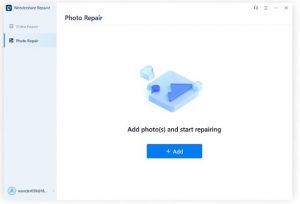
Step 1: Restore the image
Once the application is launched, you’ll notice a button labeled ‘Add File’ inside the middle of the picture. To upload the local photograph to fix from either Mac or Windows system to the program, click that option.
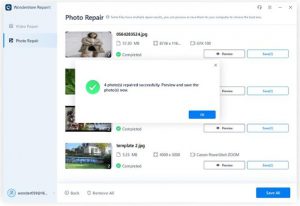
Step 2: Processing
Click the ‘Repair’ button after you’ve picked and loaded the photographs into the program you want to fix. This click will begin the recovery process. This could take a few moments.

Step 3: Save and restore
Once the restoration procedure is completed, a checklist of all the mended items will show up. You can now examine the items and mark the ones you would like to restore with the program.
Tips to Avoid Blurry Pictures
If not, here are some pointers on avoiding and correcting blurry photos.
- Before taking a photograph, clear the lens because that could make the image appear fuzzy.
- It is preferable to have a steady hand. The flimsier hand captures the fuzzy photographs.
- The shooter must correctly focus on the item to produce a clear picture.
- A quality lens is also necessary for getting a good photograph that everyone will appreciate.
Final Words
This article aims to offer visitors all of the required knowledge to assist them in eliminating fuzzy images and capturing high-quality shots. So that’s everything we know about how to fix blurry images. The major purpose is to provide the reader with all of the necessary information to help them eliminate fuzzy pictures and capture high-quality images. We recently highlighted the finest tool for repairing fuzzy photos, Wondershare Repair, and the quickest technique to fix pictures.


